SSH
We can connect to servers via SSH. SSH is a way that your computer speaks with the server and let’s you run commands on the server. Everything is done in a Shell which is a Command Line Interface (CLI). What this means is that you type a command into it, press enter and eventually see the output of the command. You can use this to list a directories contents, install programms and more.
Connection on Linux
You can connect to the server with a basic ssh command:
localuser@localhost ~ $ ssh root@intern.queereszentrumtuebingen.de
rootis the username we use on the server. It has permission to do everythingthe
intern.queereszentrumtuebingen.deis the domain of the server that you want to connect to.
This would result with our example user in:
localuser@localhost ~ $ ssh root@intern.queereszentrumtuebingen.de
root@intern.queereszentrumtuebingen.de's password:
Now here you see a problem: You don’t have a password! In fact, there is no way to connect to the server using passwords as they are not secure or convenient. Instead of using a password, we authenticate via SSH keys.
Generate an SSH key
We will use OpenSSH to generate the pair of keys, open your local shell and enter the following commands. The first one will move you to your .ssh` directory, the second one will create the key:
localuser@localhost ~ $ cd .ssh
localuser@localhost ~/.ssh $ ssh-keygen
Generating public/private ed25519 key pair.
[..]
At first you will be asked for a filename. Please put in a name you can identify later like username_qzt then press Enter to confirm the name and path:
[..]
Enter file in which to save the key (/home/localuser/.ssh/username_qzt):
You will then have to enter a passphrase blindly, this is correct and intended (you have to enter it twice to make sure it’s entered without any typos):
[..]
Enter passphrase (empty for no passphrase):
Enter same passphrase again:
You should then receive a confirmation output like this:
[..]
Your identification has been saved in /home/localuser/.ssh/id_ed25519.
Your public key has been saved in /home/localuser/.ssh/id_ed25519.pub.
The key fingerprint is:
SHA256:fpfpfpfpfpfpfpfpfpfpfpfpfpfpfpfpfpfpfpfpfpf localuser@localhost
The key's randomart image is:
[..]
You should now have 2 files (within the path that you confirmed before) and it is important to know the difference:
username_qztis your private key file that should never leave your device.username_qzt.pubis the public part of your new keypair. The content of that file should be shared with a server to establish the verification.
Your public key must be added on the server to allow you in. Ask an existing administrator to do this.
The files contents will be added as new line to the /root/.ssh/authorized_keys file on the server.
Tipp
It’s best practice to generate a separate key pair for every device you’re using; you can allow as many SSH keys to access your account as you like, and using different keys makes it easy to e.g. remove a single key if one of your devices gets lost.
Connecting to the server
localuser@localhost ~ $ ssh -i ~/.ssh/username_qzt root@intern.queereszentrumtuebingen.de
~/.ssh/username_qztis the location of the private key file.rootis the username we use on the server. It has permission to do everything.the
intern.queereszentrumtuebingen.deis the domain of the server that you want to connect to.
Add your key to the ssh-agent
From now on you’d have to enter the passphrase of your private key whenever you’re about to connect to a server, but:
Most Linux distributions have already set up ssh-agent for you.
This is a program running in the background, started upon login, holding your unencrypted key in memory (not on disk) as long as your local session lasts. This means that until you reboot your local system, you only need to unlock your private key once irrespective of how many destinations you’re using it for.
Add your private key to the agent’s keyring:
localuser@localhost ~ $ ssh-add ~/.ssh/username_qzt
Enter passphrase for ~/.ssh/username_qzt:
Identity added: ~/.ssh/username_qzt (localuser@localhost)
If ssh-agent unexpectedly is not preconfigured on your local system, please refer to your operating system’s documentation
on how to do it (different operating systems use slightly different ways to achieve this).
Using a config file
Especially when using connections to multiple servers you will benefit from managing these in a SSH config file. On your local system
create a file ~/.ssh/config and give it the right permissions for SSH to read:
localuser@localhost ~ $ touch ~/.ssh/config
localuser@localhost ~ $ chmod 600 ~/.ssh/config
localuser@localhost ~ $
(How you need to do this will of course depend on your operating system.)
You may add an example basic config like this to the file:
Host qzt
  Hostname intern.queereszentrumtuebingen.de
  User yourusername
  IdentityFile ~/.ssh/username_qzt
From then on you will be able to login by using:
localuser@localhost ~ $ ssh qzt
You are totally free in chosing a name (-schema) for Host, you may also use the asterisk * for multiple connection types and there are a lot more of
configuration possibilities. The internet will serve you with more information about it.
Connection on Windows
On Windows you have two possibilities: Using WSL which enables you to use Linux on your Windows machine. After you run WSL you can follow the guide for linux.
Alternativly you can use the grate tool named PUTTY.
Installing PUTTY
First, download the MSI (Windows installer) package from the PuTTY download page which includes all PuTTY tools we’re going to use (PuTTY itself, the PuTTYgen key pair generator and the Pageant SSH agent). Use the 64-bit version if your system is not ancient.
Installing the PuTTY tool suite should be pretty straightforward; you don’t need to do anything special here - just accept the defaults.
Generating a SSH key
To generate a SSH key Putty has it’s custom tool called „PuTTYgen“. You can open it like
any other programm in Windows. First make sure that you select ED25519 as type of key to generate.
Others work too but these the most secure and easiest to handle due to their short key length.
Make sure to add a passphrase to the key and to store this passphrase in a password manager.
If you don’t know what a password manager is write the passphrase down in a place where you will find it.
Adjust the key comment to something meaningful like username_qzt.
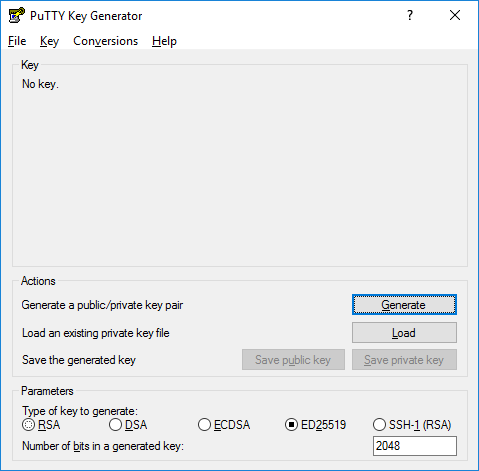
Screenshot of PuTTygen
Make sure to store both the public and private key in a location you will later find.
Warnung
Never share your key with anyone else. The private key will give access to the server and all data on it. No other administrator will ask for it. As the private key is sensitive you must not store them in a cloud, especially not in the QZT Cloud.
To login to the server an existing administrator places the public key in the .ssh/authorized_keys file
Conneting via PUTTY
Open putty and go to Connection->SSH->Auth->Credentials and selecte your private key for authentication by clicking Browse… on the bottom of the settings page.
Go back to Session and put in root@intern.queereszentrumtuebingen.de as Host Name (the root is the user you want to login as). The port can stay the same.
Now make sure to put a name in Saved Session and click Save. This will store this configuration. You now see thi in the list of stored settings.
Double click on the setting you just created and you will connect to te server! Congrats!